Since first setting up my
Cadillac page, I have been surprised and
flattered to get questions from fellow Cadillac Owners. I am
relatively new to owning a classic Cadillac, but I am happy to help.
This page is an assembly of lessons, resources, and stories that I have
collected along the way from generous fellow enthusiasts.
The most helpful bunch of enthusiasts on the net had been the good folks on The Cadillac
Mailing List which was part of Yahoo! groups. Those people know
WAY more than I do, and what little
Mailing List.
Stefan Kozanda owns a
magnificient
triple-orange convertible and runs
House of Cadillacs (which is
currently under construction).
Recommended Reading
There are three main books that you want if you plan to do any work on
your 1975 Eldorado. These are the 1974 Cadillac Shop Manual
(big),
the 1975 Shop Manual Supplement (small) and the 1975 Fisher Body Manual
(the Eldorado Convertible is the E67 body). Optionally, you can
get the 1971 Folding top supplement for the "B" and "E" series, but
that mostly just replicates the inforation in the Fisher Body manual.
These manuals routinely appear on
eBay
for $15-$25. There are also PDF scanned versions of these manuals
floating around among enthusiasts. You can find some scanned manuals at the
Internet Archive.
It is amusing to look at the original
print advertisement for the 1975
Eldorado, which was scanned by Dermot Thompson, keeper of a LOT of
dealer paper materials on all kinds of Cadillacs.
Bruce Roe has a lot of general advice on maintaining old cars,
especially GM cars from the 70s. I have assembled a VERY TINY
SUBSET of his
collected wisdom
here. He really
needs to run his own website, he is a fountain of old Cadillac
knowledge.
Convertible Top and
Weatherstripping
Derek Sherwood has written an
excellent
article on the GM scissor top which he has graciously allowed me to
publish on this site.
The GM inward folding convertible top (also known as the "scissor top")
was manufactured from 1971 to 1976. It holds the honor of being
the heaviest convertible top ever manufactured. It is both a
marvel of engineering and a fussy diva that demands a lot of attention.
Fortunately, some people specialize in this beast. You can
get parts from Convertible Service (
www.convertibleparts.com), TopsDown (
topsdown.com),
or Hydro-e (
www.hydroe.com).
The motor, relay and gears live behind the rear seat. To
get to it, you have to push the bottom rear seat cushion back and then
pop it up in the front. You then have to remove the seat belts
(you need a Torx T50 bit), and take out the seat back by lifting it
straight up. Replacing the relay is easy. Replacing the
motor or drive cables is not much harder. Replacing the side
guide
cables is more of a pain in the tookus. Have a friend help you,
and have cold beer ready for when you finish. And remember:
NEVER store anything in the convertible top well, or you can
break
the rear glass which is VERY EXPENSIVE to replace. Generally upi
have to replace the whole top to make that fix which is typically
USD$3500 parts and
labor.
All of your weatherstipping is likely all rotted and shot, like mine.
The most used weatherstripping supplier seems to be
Steele Rubber.
In the San Francisco Bay area, there are two shops that I know of who
will even touch a scissortop. They are
Harold's
Upholstery in Palo Alto and
Costa's
Custom Covers in San Jose.
Finding Other Parts
DeBaer's Cadillacville
(www.cadillacville.com) is a great (though somewhat expensive)
source of used parts, and they provide great blowup parts diagrams with
names of all of the common parts on line. Look for the 1975-76
Cadillac.
USA Parts
Supply (http://www.usapartssupply.com/) also has a lot of parts for
this vintage car. Another person recommended
Classic Car
Auto Parts. Hot Rodders
who want to make the stock (horribly detuned) 500ci powerplant live up
to its potential can get performance parts at
www.cad500parts.com. A
previous owner (Rik Gruwez) reported that merely changing the camshaft
brought the engine new power and life.
Interior
For interior upholstery (all carpets, vynil, and leather, including
complete seatcover kits), Ron Fryer is the undisputed worldwide
authority on the 1970's Cadillac and a large number of other vehicles.
He lives at
Autocentral.com.
Dashboard replacements seem to be the specialty of
Just Dashes (www.justdashes.com)
For the lower-budgeted, some remedies are available. The
worn silver trim on the dash and on the Cadillac Script on the dash was
very ugly. A cheap solution was to paint on new silver with a
reflective silver paint pen, like the Zig Painty Pen or
Pilot Extra Fine
Point Silver Marker. Clean the parts to be painted, of the
paint pen will clog. If it clogs, use Goof-Off (latex paint
remover) of paint thinner to clear of the dirt from the pen tip.
Dyeing is a tricky subject. Turns out my car interior is Antique
Light Blue, which is a mottle of a light and dark blue. No off
the
shelf single-color dye can replicate it, and no custom color will match
it. I have yet to dye any patrs, but a lot of folks swear by
Leatherique (www.leatherique.com).
Anotehr friend was pleased when he used shoe color spray paint on his
seats
and
side panels. Ron Fryer provides dyes with his kits. I plan
to pick his brain soon.
I recently (September 2008)
replaced the seats
in my convertible with seats from a coupe. The front seats are a
perfect fit, as are the front door panels. The rear sets fits,
albit snugly. The upper and rear lower panels cannot fit.
The lower panels do not have the opening for the courtesy light in the
front and the opening in the top is too small. The coupe has
fixed rear windows, but the convertible has power windows controls that
are in the same space as the ashtray/cigar lighter. The upper
panels are too large because of the convertible top.
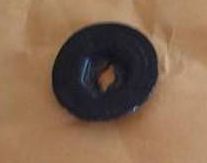
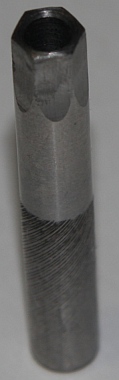
The upholstered pads on the upper panels of the door and rear are held
in with these
little evil connectors
("Speed Nuts") which are easy to put on but impossible to remove.
The fastener is like an inverted nut. They have an interior dimension
of about 7mm and are screwed on to a pole that sticks out about
2-3 inches. They can be driven with a 7mm hex key - if it
were hollow. I need to push a hex driver OVER the pole to mate to
the fastener to remove or tighten it. A coupling nut could do the
job, but none commercially available have an appropriate external
dimension. We put out a cry for help to our mailing lists and two
gurus responded. Tony G. machined a
custom
tool for the job, and Warren H. modified
a
10-24 coupling nut to do the
job. Car enthusiasts are some of the most creative people I
know. As an aside, 1968 Eldorados use a similar nut, and Warren
has a tool for that, too!
Radio and Speakers
As part of the full "1975" experience, I have a 4-speaker Delco 8 track
audio system installed I proudly own both a 1976 and 1978 unit,
but do not have an actual 1975. 1975 was the
last
year that the rear speakers were "chassis return" meaning that they
have
only one wire to each speaker and use the chassis of the car as ground.
1976 and later used 2 wires per speaker (independent ground), so
if you use a later than 1975 radio or any more modern stereo, you need
to run extra wires to the rear of the car (a wire conduit runs under
the
carpet on the passengers side). I have added these dedicated
ground wires.
The radios of that era used 10 ohm speakers, which used to be
impossible to find, except as expensive NOS (new old stock) or
reconed originals
($40-$80 a speaker, yuk). There is now a company called
Electro-Tech that
makes new, small magnet 10 ohm speakers using special rare earth
magnets, and they tend to be cheaper than NOS speakers, and probably
more reliable since they are made of new parts. I use modern 4
ohm speakers (which alre labeled "8 ohm compatible, whatever that
means), but I am
told that this is a BAD idea (it works, but I understand that it
stresses out the amp and also gives suboptimal sound). A
number of shops can tweak the electronics to work optimally with modern
4 ohm speakers, and I hope to publish instructions on how to do that
someday. www.wonderbarman.com (site defunct)
is an expert in these old radio and offers some advice, and complete
overhaul and refurbish services. He is an expert and a purist,
and
is very expensive. Serious collectors and perfectionists can use
him. As a backyard hobbyist, he is too expensive for me.
The light in my radio did not work. The lamp is a common base
size, but of a wattage so it was not carried at my local parts place.
It was neccessary to remove the radio in order to replace the
bulb. To remove the radio, you must removing the lower dash pad
(and 3 of the 4 vents) and two lower panels and the ashtray! Once
I got it, I replaced the bulb and it STILL didn't work! I
traced the wires and found there is a small switch (two metal srtips
really) that break the light circuit (mechanically) when an 8 track
tape
is inserted. A little prodding and bending with a mechanical
screwdriver made them connect and illuminate the light. In the
process or learning this lesson, I developed a techique to change the
radio light bulb without removing the radio, and I have the skinned
knuckles to show for it.
Cory Heisterkamp retrofitted
a 1970's era Delco radio with a CD player. I couldn't
possibly out-geek that.
Tires and Hubcaps
The original tires of the 1975 Eldorado sported a 1 5/8" wide
whitewall. The now discontinued Firestone FR721 is one of the
most
recommended replacements.
Coker
Tire (www.coker.com) also makes a wide whitewall for that vintage,
but their website is usually a mess and it is better to call them and
ask. The wide whitewall is getting harder to find. FR721s
seems to be stocked at a variety of smaller independent tire outlets
throughout the US, I got mine at "Tire Outlet Center" on 2nd street in
San Jose.
The 1975 Cadillac Eldorado hubcaps centers were UNPAINTED chrome.
The 1976 Eldorado centers were black, unless you have a
Bicentennial Edition, which had white hubcaps. The 1977-78 (post
convertible years) models had a color-keyed hubcap available.
Since the wheels are the same size on each model year,
enterprising ownerws happily swap hubcaps among those models, much to
the dismay of the purists!
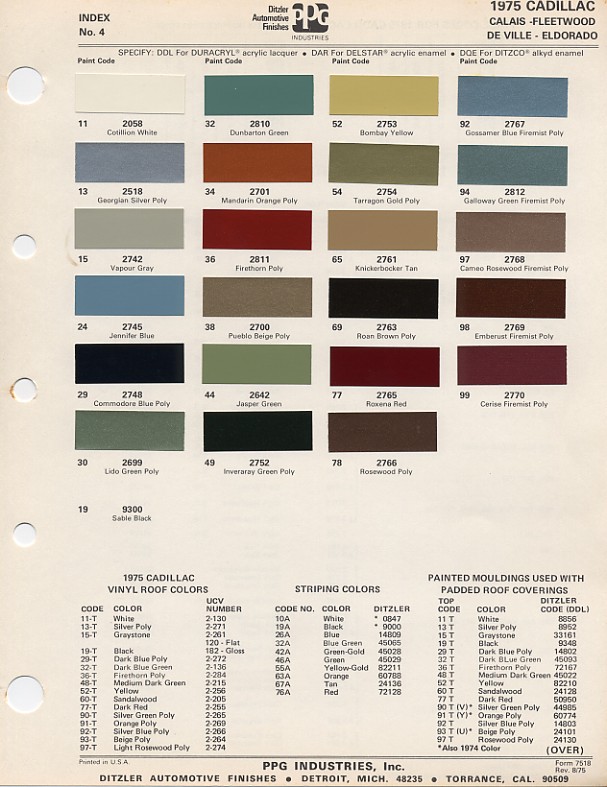
Exterior
The Class 3 towing hitch is welded to the frame and is not removable.
If you are not sure what color your car is, look at this
paint chart.
Air Conditioning
There seems to be no point in having air conditioining in a
convertible, but fellow owners in Arizona and Southern California
vehemently disagree. My compressor recently seized and my
evaporator leaks, so I have just given up. You can get a shorted
belt to drive just the power steering pump from that water pump pulley,
instead of the "Water Pump - A/C compressor - Power Steering Pump"
triumverate. The Commercial Chassis using the 472 or 500 cubic
inch engine were available withotu A/C and you can use that shortened
belt length. Unfortunately, since the crankshaft pulley and water
pump pulley have NO clearance between them, you need to pull off the
water pump pulley to add the shorter belt.
Another problem with my system was that the comrpessor fuse was blown.
There is a fuse mounted to the cowl that pops to protect the
compressor when the system goes dry. Frank Reynen suggests:
If the fuse is blown, the compressor has
been run hot and without oil for some time and is more than likely
damaged and I also suspect that the shaftseal is damaged and is likely
the source of the original leak. Given that my compressor
subsequently seized, I suppose that this was sound advice.
There is a great religous war about what refrigerant should be used.
Purists swear by R-12. Others claim that you can run R-134a in a
stock system if you just use a VOV (Variable Orifice Valve).
Others still put in R-134 directly, or use alternative
refrigerants. Mike Kord had excellent luck directly dropping in
ES-12a
in his 1967 Fleeetwood.
You may
also read a great summary about refrigerants here.
Frank Reynen did a direct R-134a retrofit in his 1972 Coupe DeVille.
He said:
The best fix is to replace the
compressor with a rebuild unit and charge the system with 134A and polyol oil that does
not need to have the old oil removed
since the 134A will not mix with it and it will wind up somewhere in the condenser and stay out of circulation.
Most of the oil will be removed with the old compressor. This way if you
need to recharge, you can do it yourself since you now have the experience
and the equipment. I did
just like that and is still working after 5 years.
Old Air Products
(www.oldairproducts.com) seem to be an authority on the topic of
old
A/C servicing.
Electrical
When you blow the interior lights fuse, a special light bulb near the
fuse box turns on so that you can locate the fuse box and repalce the
fuse. This is very clever, except when you have an electrical
fault that KEEPS blowing the fuse and you opt not to replace that fuse.
Tom Bombaci gave up on repairing his interior lights and
mysteriously ran his battery down a dozen times before he discovered
that bulb was the culprit.
The sensor for the automatic headlights (Twilight Sentinel) is mounted
in the same place as the driver side speaker. It has a tendency
to
get dusty or fall out of its mount into the dark dash. If either
happens, your will have "Virtual Daytime Running Lights" whether you
like it or not 8-). Remove the lower dash pad to pull out and clean the
photocell sensor.
The interior blower runs on low even when the climate control is off.
This freaked me out for a while, thinking my climate control was
not shutting off. This is the design.
Transmission of the front wheel drive Eldorado,
and Switch Pitch conversion (by Bruce Roe):
The THM400 [THM=Turbo Hydramatic] is one of the easiest automatics to
work on from [General Motors]. That's partly because its so
simple, and partly because with all that steel inside not a lot gets
broken. The [THM]425 (FWD version) is a bit more complex but just
as tough.
There were a couple of weaknesses in the early units, which didn't show
up till it had a lot of miles. By 1970 the design was pretty much
debugged and foolproof. After that they started looking for ways
to make them cheaper. The problems these days are usually with
the
rubber and plastic parts. The rubber seals get hard and don't
seal, you lose pressure, clutches slip, and the trans burns up.
But its not too hard to throw in a new set of seals when the
transmission is pulled. The plastic parts in time crack, bend, or
break.
Most of the bad parts can be swapped out for the best version of a
different year. I always braze a piece of 1/4" steel to the pan
and tap it for a drain plug, makes regular maintenance much
easier.
I like to take parts from 2 transmissions of different years, and build
up one with the best combination of parts to fit my vehicle. The
older unit supplies the switch pitch parts.
The 65-67 B/O/C versions all had switch pitch torque converters.
That means the blade angle of the stator could be changed from
"economy"
to "performance" mode ate any time, giving it a dual mode in any
gear. Instead of a fixed, compromise stator blade angle, switch
pitch picks up both performance and a few points of economy, with extra
smoothness thrown in. 25% more torque multiplication is
available.
A SWP car with gas saving 2.41:1 axle ratio can cruise at under 2000
rpm at 60 mph, yet be faster than a non SWP with a 2.73:1 axle.
The only thing that can do any better at both ends is a 4 speed trans
with lockup torque converter, and these are tinfoil inside by
comparison. The exception is the 4 speed decendant of the 400,
the
4L80E. Don't confuse this with the 4T80E, which is not
in the same league. I have a box with parts from a 400 and the
equivalent part from a 200 or 350 trans. I like to lay on the
table the output shafts, clutch plates, clutch housings, and
stators. It doesn't take an engineer to see which is stronger; it
would not be an exaggeration to say the 400 part has 3 times the
material or even more.
The THM425 was only available with switch pitch in 66/67. My 79
Eldorado has been converted from a 325 trans to a 67 Eldorado 425
switch
pitch. Much less painful switch pitch conversions have been done
on my other cars.
The GMC 73-78 Motorhome people have done a lot of conversion to switch
pitch. Read their experiences at
http://www.california.com/~eagle/SWITCH.html
They mention about a 7% improvement in 0-60, I see up to 10 % on less
powerful cars. It can really perk up a diesel car. There is
at the beginning a link to other 400 & SWP stuff, or try
http://www.bdub.net/tranny/index.html.
Some chose to control the switch pitch with a toggle switch, and some
use an available electronic control which is much better than the
[General Motor's original] control.
[It] must be (slightly) cheaper to bore an engine bigger, than to make
that fancy stator element and a good electronic control. Note
that
when switch pitch was dropped in 1968, Olds raised their 330 to 350,
their 425 to 455, Cad raised their 429 to 472, and somewhere around
there Bu*ck went from 430 to 455. To compensate for the reduced
torque multiplication?
It was really a 2 stage deal. Only half the capability of the SWP
was used when introduced, because the electrical control was so
crude. On many cars that old it doesn't work at all now (run my
"click" test). Then they dropped that advantage after 3
years. I get far more driveability out of the SWP with a decent
electronic control. I was designing circuits in 1967, and it
would
not have been hard to do just as good a control with the technology of
the day (I like programmable unijunctions). Another guy I
talked to did the equivalent using vacuum stuff.
Now they went back to get some gas mileage, but its a lockup
clutch. Hardly an elegant solution, but that 0 % slip is the only
thing they see. The first one I got drove me crazy for 15,000
miles until I ripped it out. It took a full blown computer (ECU)
to tame the thing.
[Regarding interchangability]: The 66-78 FWD ([Toronado/Eldorado]) all
used THM425. They pretty much interchange, except the 67 Eldo had
a 429 pattern.In 79 the Toro/Riv/Eldo downsized to the THM325 through
1985. No way would this trans survive in a 500 inch 75
Eldo.
The 82-85 were overdrive/lockup clutch.
Catalytic Converter Replacement
(Craig M Séman, Cadillac
Craft Center (defunct link) http://www.cadillaccraftcenter.com
I have had good luck installing MAREMONT 38503 and 38603 universal
hi-flow catalytic converters on older applications. It is about 50% of
the size of the old flat bed models. Depending on your jurisdiction you
might be able to remove the converter alltogether. Here [North
Carolina,
USA] we have inspections and cannot do. Those two part #s above are for
universal straight pipe fit applications 2 1/4 and 2 inch respectively.
They are around USD$70 each. JEGS and SUMMIT do have high performance
versions but are twice the price.